Fairhope Drywall Repair Pros (251) 270-4751Open 7 days, 7am–9pm

Drywall repair in Fairhope that starts at the source of the damage

A stained ceiling, a soft wall or a seam that has let go is a sign of something else: a roof flashing, a sweating pipe, a door that swings too far, a bathroom without enough air. We check for that cause first, then open, dry, rebuild and finish the wall so the repair lasts on this humid side of Mobile Bay.
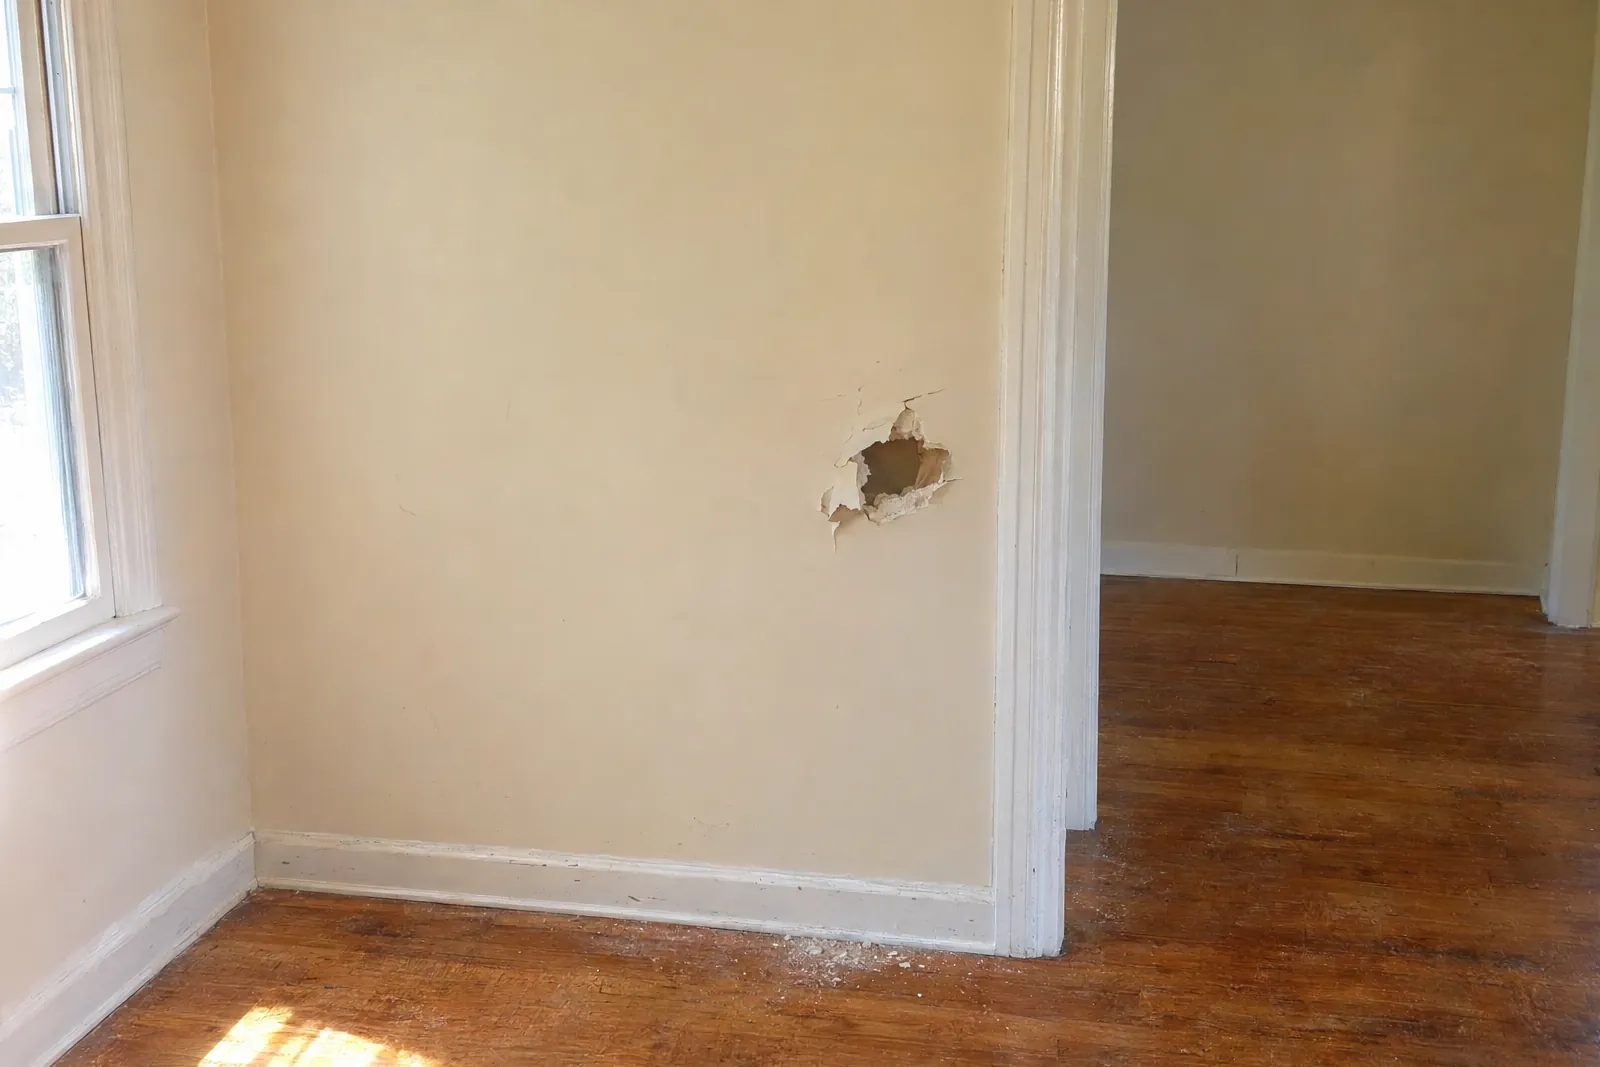
An irregular hole with torn paper edges in a cream-painted wall beside a doorway, with gypsum crumbs on the wood floor below it.
An impact hole beside a door casing, broken paper and crumbled gypsum still on the floor.

Services

Match your wall to a repair

Four kinds of work make up most of what we do around Fairhope. Each one begins the same way, with a moisture meter on the board and a look above, behind or below the damage, because the mark you can see is often some distance from whatever caused it. Pick the card that sounds like your wall; if none of them fits, a phone call sorts it out quickly.

Water Damage Drywall Replacement

Walls and ceilings that took on water from a storm, a roof or a supply line: wet board cut out, the cavity dried, new sheetrock hung and finished.

Replacing water-damaged walls and ceilings

Ceiling Stain Repair

Brown rings, tide lines and soft spots overhead, followed back to the roof, the attic or a bathroom above before any stain blocker goes on.

Fixing stained and sagging ceilings

Seam, Tape and Crack Repair

Tape that bubbles, joints that show through the paint and cracks running from door corners, reset with fresh tape and compound suited to humid rooms.

Resetting lifted tape and cracked seams

Drywall Hole Patching

Doorknob dents, fist-size breaks and old anchor holes, backed, taped and feathered wide so the repair disappears once it is painted.

Patching holes of every size

Water in the wall

Work through a leak in order

Water-damaged drywall goes wrong when the steps get shuffled. Paint over a stain that is still damp and it bleeds back through within weeks. Hang new board against a wet stud and the new board soaks up the moisture. This is the order we follow on every water job, and it is the same order that works if you start on it yourself.

  1. Stop the source. Close the valve under the sink or toilet, or the main if you can't find the branch. For a roof leak, a tarp outside or a bucket under the drip holds things until a roofer can look. Nothing on the wall should be rebuilt while water is still reaching it.
  2. Dry the room. Run fans and a dehumidifier, pull the baseboard on soaked walls so air reaches the bottom edge, and open closet doors. A closed room with wet board in a Gulf Coast summer will not dry by itself.
  3. Take readings. We check the board with a pin meter and a scanning meter, starting well outside the stain and moving inward until the numbers change. That boundary, not the edge of the brown ring, shows how far the water went.
  4. Decide what to cut. Board that is soft, crumbles behind the paper or still reads wet after several days of drying comes out. Board that has dried back to normal readings and is still firm is usually fine to prime and refinish in place.
How roof water reaches a ceiling Side view of a roof and attic. Water enters at the flashing beside a vent pipe, runs down along a rafter, drips off at a low point onto the ceiling board, and spreads into a stain several feet from where it got in. 1 Enters at the flashing 2 Runs along the rafter 3 Drops at a low point 4 Ring shows on the ceiling, away from the entry
Water follows the framing before it drips, so the stain marks the low point, not the entry.

The drawing shows the path we trace most often: water gets in at roof flashing, runs along a rafter or joist, and shows up on the ceiling several feet from where it entered. The full process is on the page about replacing drywall after storm and pipe leaks.

Repair day

Expect this on repair day

  1. A second look on arrival. Even when photos came in ahead, we check the area again with a meter and a flashlight skimmed along the surface. Walls change after a few days of drying, and if what we find is bigger than what was described, you hear that before anything is cut.
  2. Covering the room. Floors, furniture and vents are covered before the first cut (more on that below).
  3. Opening up or prepping. On water jobs that means cutting back to dry, sound board along straight lines, usually to the nearest studs. On holes and cracks it means trimming loose paper and crumbled gypsum and setting backing where the patch needs support.
  4. Coats. Tape and a bedding coat go on first, then fill coats, each one wider than the last so the edge fades into the wall. Most patches take three coats; a large ceiling section can take more.
  5. Drying between coats. Joint compound dries slowly in muggy air. On humid days we use setting-type compound for the early coats, which cures through a chemical set instead of waiting for water to evaporate, so a small job does not stretch into extra days.
  6. Cleanup. Sanding runs through a vacuum where possible, the plastic comes down, and the floor is vacuumed. If painting was included, primer and finish go on once the compound is dry and has been checked under a raking light.

Small repairs often finish in one or two visits. Replacement after water damage usually needs more, because each coat has to dry before the next.

Local housing

Read the history behind your walls

Fairhope has had well over a century to build up layers of houses. The town began in 1894 as a single-tax colony, and the city and the shore around it filled in over many different decades. A few notes on the areas we work in often, and what each one means once a wall is open:
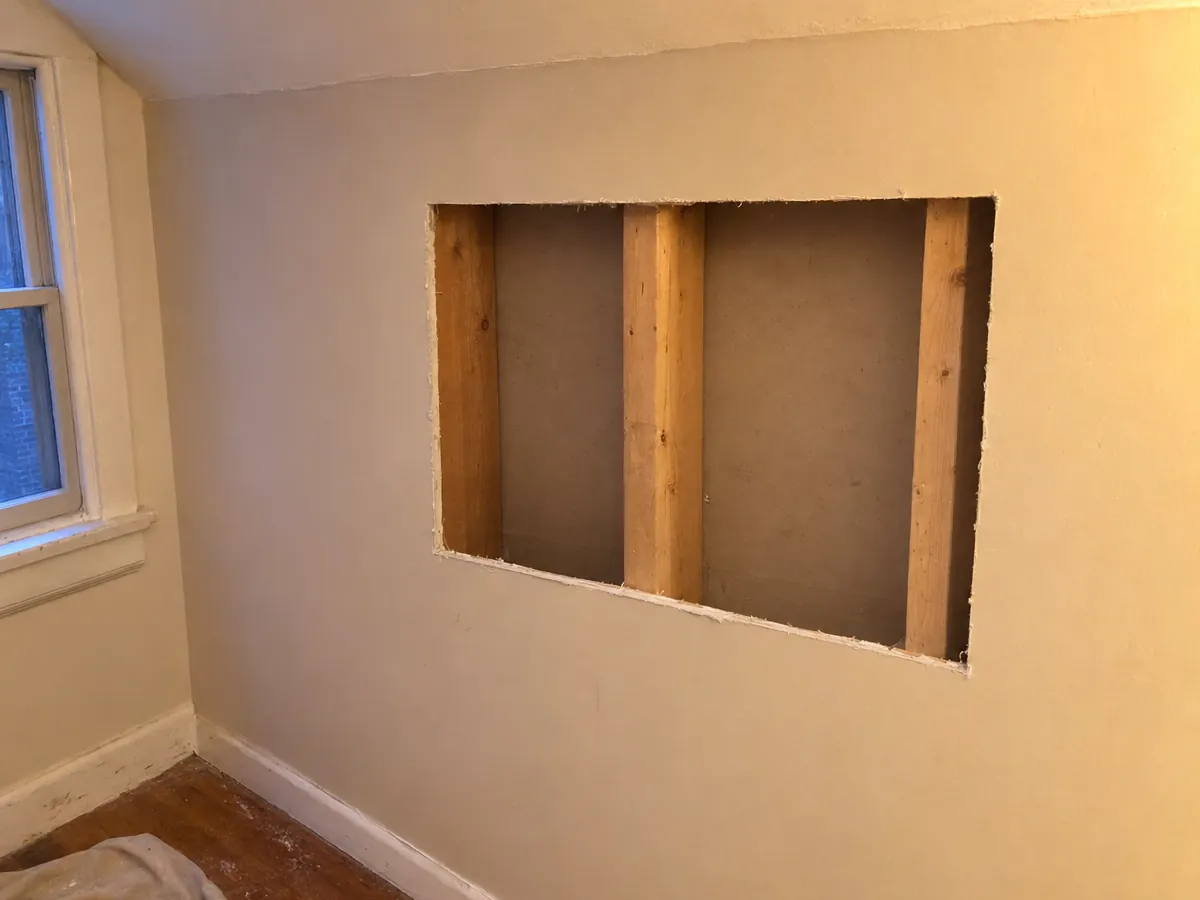
A rectangular opening cut into a painted wall under a sloped ceiling, showing three wooden studs and the back of the wall cavity.
Cut back to the studs so the framing can be checked and dried before new board goes up.

Montrose cottages

The Montrose Historic District, on the National Register since 1976, holds Creole cottages with five-bay fronts and deep recessed porches. Many were first built as summer homes for Mobile families, and some go back to the middle of the 1800s. Houses like these have usually been reworked more than once, so before cutting we check whether a wall is original material, drywall added later, or one laid over the other.

The Bayfront District

The Fairhope Bayfront District, listed in 1988, runs roughly between Fels Avenue and Blakeney Street from Summit Street to the bay. Many houses here are older than the drywall in them. Decades of remodeling can leave board of different thicknesses meeting at one seam, so we measure the edge of the opening before ordering a replacement piece.

Point Clear along the water

In Point Clear many homes, often called cottages, face Mobile Bay directly. Walls on the bay side take wind-driven rain head on during a storm, so after one we start inside those walls, at window corners and along the bottom few inches.

Away from the water, the newer subdivisions are wood frame with drywall throughout. Their trouble spots are different: nail pops, seams that read through paint, and tape lifting in bathrooms and laundry rooms.

Garages

Treat garage walls as their own case

Where a garage shares a wall with the living space, or has bedrooms over it, that wall and ceiling are normally fire-rated board, thicker and denser than the half-inch sheets in a bedroom. A hole or a cut-out there gets a patch of the same rated board, taped and finished, not a scrap of whatever is on hand. We check the thickness and the markings on the edge of the opening before patching.

Garage walls take a different kind of damage than living rooms. Car doors, bicycle handlebars and ladders leave dents and breaks at bumper height. Storm water pushed under an overhead door wicks up from the slab, and gypsum draws it several inches higher than the puddle reached. On those walls we take readings from the floor up, mark the highest wet point, and cut a straight line above it.

Timing matters here. If the slab is still wet, or the garage floods again with each heavy rain, new board at the bottom of the wall will soak up water the same way the old board did. In that case the right move is to wait, fix the drainage or the door seal, and come back once the readings hold steady. The same goes for a converted garage or a ground-level bonus room.

Dust and floors

Keep the dust where the work is

Sanding dust from joint compound travels. Left alone, the air handler will carry it into every room of the house, so protection goes up before any cutting or sanding starts.

  • Floors in the work area and along the path to the door get drop cloths, with rigid floor protection on hardwood where ladders will stand.
  • Furniture is moved back from the wall, or covered in place when it can't be moved.
  • Supply vents and the return grille in the room are taped over, and we ask that the system be switched off during sanding so it doesn't pull dust into the ductwork.
  • Doorways get plastic sheeting with a zip opening, so the rest of the house stays closed off while you can still get through.
  • Sanding is done with a vacuum-attached sander on larger areas, and with a damp sponge on small patches, which raises almost no dust at all.

At the end of each day the floor is vacuumed and anything loose is bagged. If the job runs across several days, the plastic stays up and the room stays usable around it where that's possible.

Doing it yourself

Decide what you can fix yourself

Plenty of wall damage is a weekend job. Nail holes, anchor holes from a shelf or a TV mount, and a hairline crack in paint can all be handled with a small tub of lightweight spackle, a flexible putty knife and a fine sanding sponge. A dent or hole up to a few inches across can take a self-adhesive mesh patch, two or three thin coats, and paint.

Some signs say the problem is bigger than a patch:

  • The board feels soft or spongy when you press near the damage.
  • A stain keeps growing, or comes back after it was painted.
  • A ceiling dips, bulges or has a seam opening in a long line.
  • A crack you filled has opened again in the same place.
  • The damage is on the wall or ceiling between the garage and the house.
  • The hole is larger than your hand, or sits over a stud, a pipe or wiring.

For any of those, a look with a meter will tell you more than another coat of spackle. Our guide to patching versus replacing a sheet walks through the same decision in more detail, and the Wall repair tips page collects what we've written so far.

Rentals

Batch rental repairs into one visit

Landlords and property managers usually call between tenants, with a list: a doorknob hole behind the bedroom door, anchor holes where a TV hung, a ceiling ring under an upstairs bathroom, a cracked corner in the hallway. Sending that list with photos lets us plan and schedule it as one visit rather than four, and bring the right board thicknesses the first time.

For a vacant unit, a lockbox code or a key at the office is enough; we work through the rooms in an order that lets the painters follow right behind. For an occupied unit, we work to the notice you give your tenant, and we plan the rooms so the household keeps a working kitchen and bathroom each day.

Water damage in a rental gets a moisture check before it gets a patch, the same as anywhere else. A ceiling stain under a tenant's shower often traces to a worn shower seal or a leaking drain joint, and fixing the drywall without that repair just schedules the same visit again. When the work is done, you get photos of each repaired spot for your file.

Area

Check whether we cover your town

Most of our work is in Fairhope itself, from the bay-side streets to the subdivisions inland. Up the shore, Daphne and Spanish Fort are regular stops, and so is Montrose, with its old cottages between the two cities. Point Clear's bay-facing homes are close by along the water.

Inland, we cover Silverhill and Robertsdale, and the small town of Magnolia Springs. Foley, where one gauge caught more than 21 inches of rain from Hurricane Sally, is on the list as well.

Each town has its own short note on the page listing the towns we serve.

Records

Photograph the damage before cleanup

Once water or an impact has damaged a wall, the clearest record is the one made before anything gets moved, dried or cut. Whether it ends up with an insurer, a landlord or just your own files, these are the things worth capturing:

  • A wide shot of each affected room from the doorway, so the location of the damage is clear.
  • Close-ups of stains, holes and cracks with a tape measure laid beside them for scale.
  • The source itself: the dripping supply line, the wet spot in the attic, the broken window seal.
  • Ceiling stains photographed with the flash off, which shows the rings and tide lines better.
  • Damaged belongings, flooring and trim near the wall, before they are carried out.

Write down the date and time you found the damage, what you did to stop the water, and who you called. Keep a piece of any board that gets cut out if someone may want to see it. We can give you the moisture readings we take on the visit to keep with your notes. What a policy covers is a question for your agent or adjuster, not for a drywall contractor.

Contact

Put the damage into a few words

Describe the damage, where in the house it is, and what you think caused it. A photo taken straight on and one from an angle tell us most of what we need before a visit.

(251) 270-4751

Open 7 days, 7am–9pm

Text a photo any time to the same number; it is read during open hours.